
Setting Up SCIM Provisioning with Microsoft Entra ID
SCIM lets you automatically provision and manage Fathom user accounts directly from Microsoft Entra ID.
Important: Contact Fathom Support First
SSO and SCIM for Microsoft Entra ID must be enabled for your organization by the Fathom team.
Before you begin, contact Fathom Support at support@fathom.video or your CSM to have Single Sign-On and Entra ID provisioning turned on for your organization. Once enabled, an admin on your account will see Single Sign-On and Microsoft Entra ID Provisioning under Settings → Organization Settings → Access Controls.
You will also need:
Admin permissions on your Fathom account
Permissions to create and configure Enterprise Applications in Microsoft Entra ID
What SCIM Can and Cannot Do
SCIM supports:
Creating users automatically when provisioned in Entra ID
Deactivating users automatically when deactivated in Entra ID
Updating basic user attributes: First Name, Last Name, Email, Timezone
Syncing team membership via groups: join and remove
Assigns license: new users provisioned via SCIM default to Free seats
In-Fathom only:
Assigning user roles (e.g. Admin vs. standard user)
Assigning view/visibility access settings: see Team Admin Role
These two actions must be configured manually within Fathom by an admin after the user is provisioned.
Step 1: Generate Your Credentials in Fathom
Make sure you are logged into Fathom under the Team you would like to associate with SCIM.
Go to Settings → Organization Settings → Access Controls.
Find Microsoft Entra ID Provisioning and click Configure. You can also go directly to fathom.video/microsoft/entra/scim_provisioning.
Generate a new set of credentials.
This page holds the four values you will need in Entra ID:
Value on the Fathom page | Where it goes in Entra ID |
|---|---|
Tenant URL | Tenant URL |
OAuth token endpoint | OAuth token endpoint |
Client identifier | Client identifier |
Client secret | Client secret |
Scope | Scope |
Keep this page open — you will be copying from it in Step 3. If you lose the client secret, revoke the existing credentials from this same page and generate a new set. Revoking breaks an existing connection until you paste the new credentials into Entra ID.
Step 2: Create the Fathom SCIM Application in Entra ID
Fathom provisions through a non-gallery Enterprise Application that you create yourself.
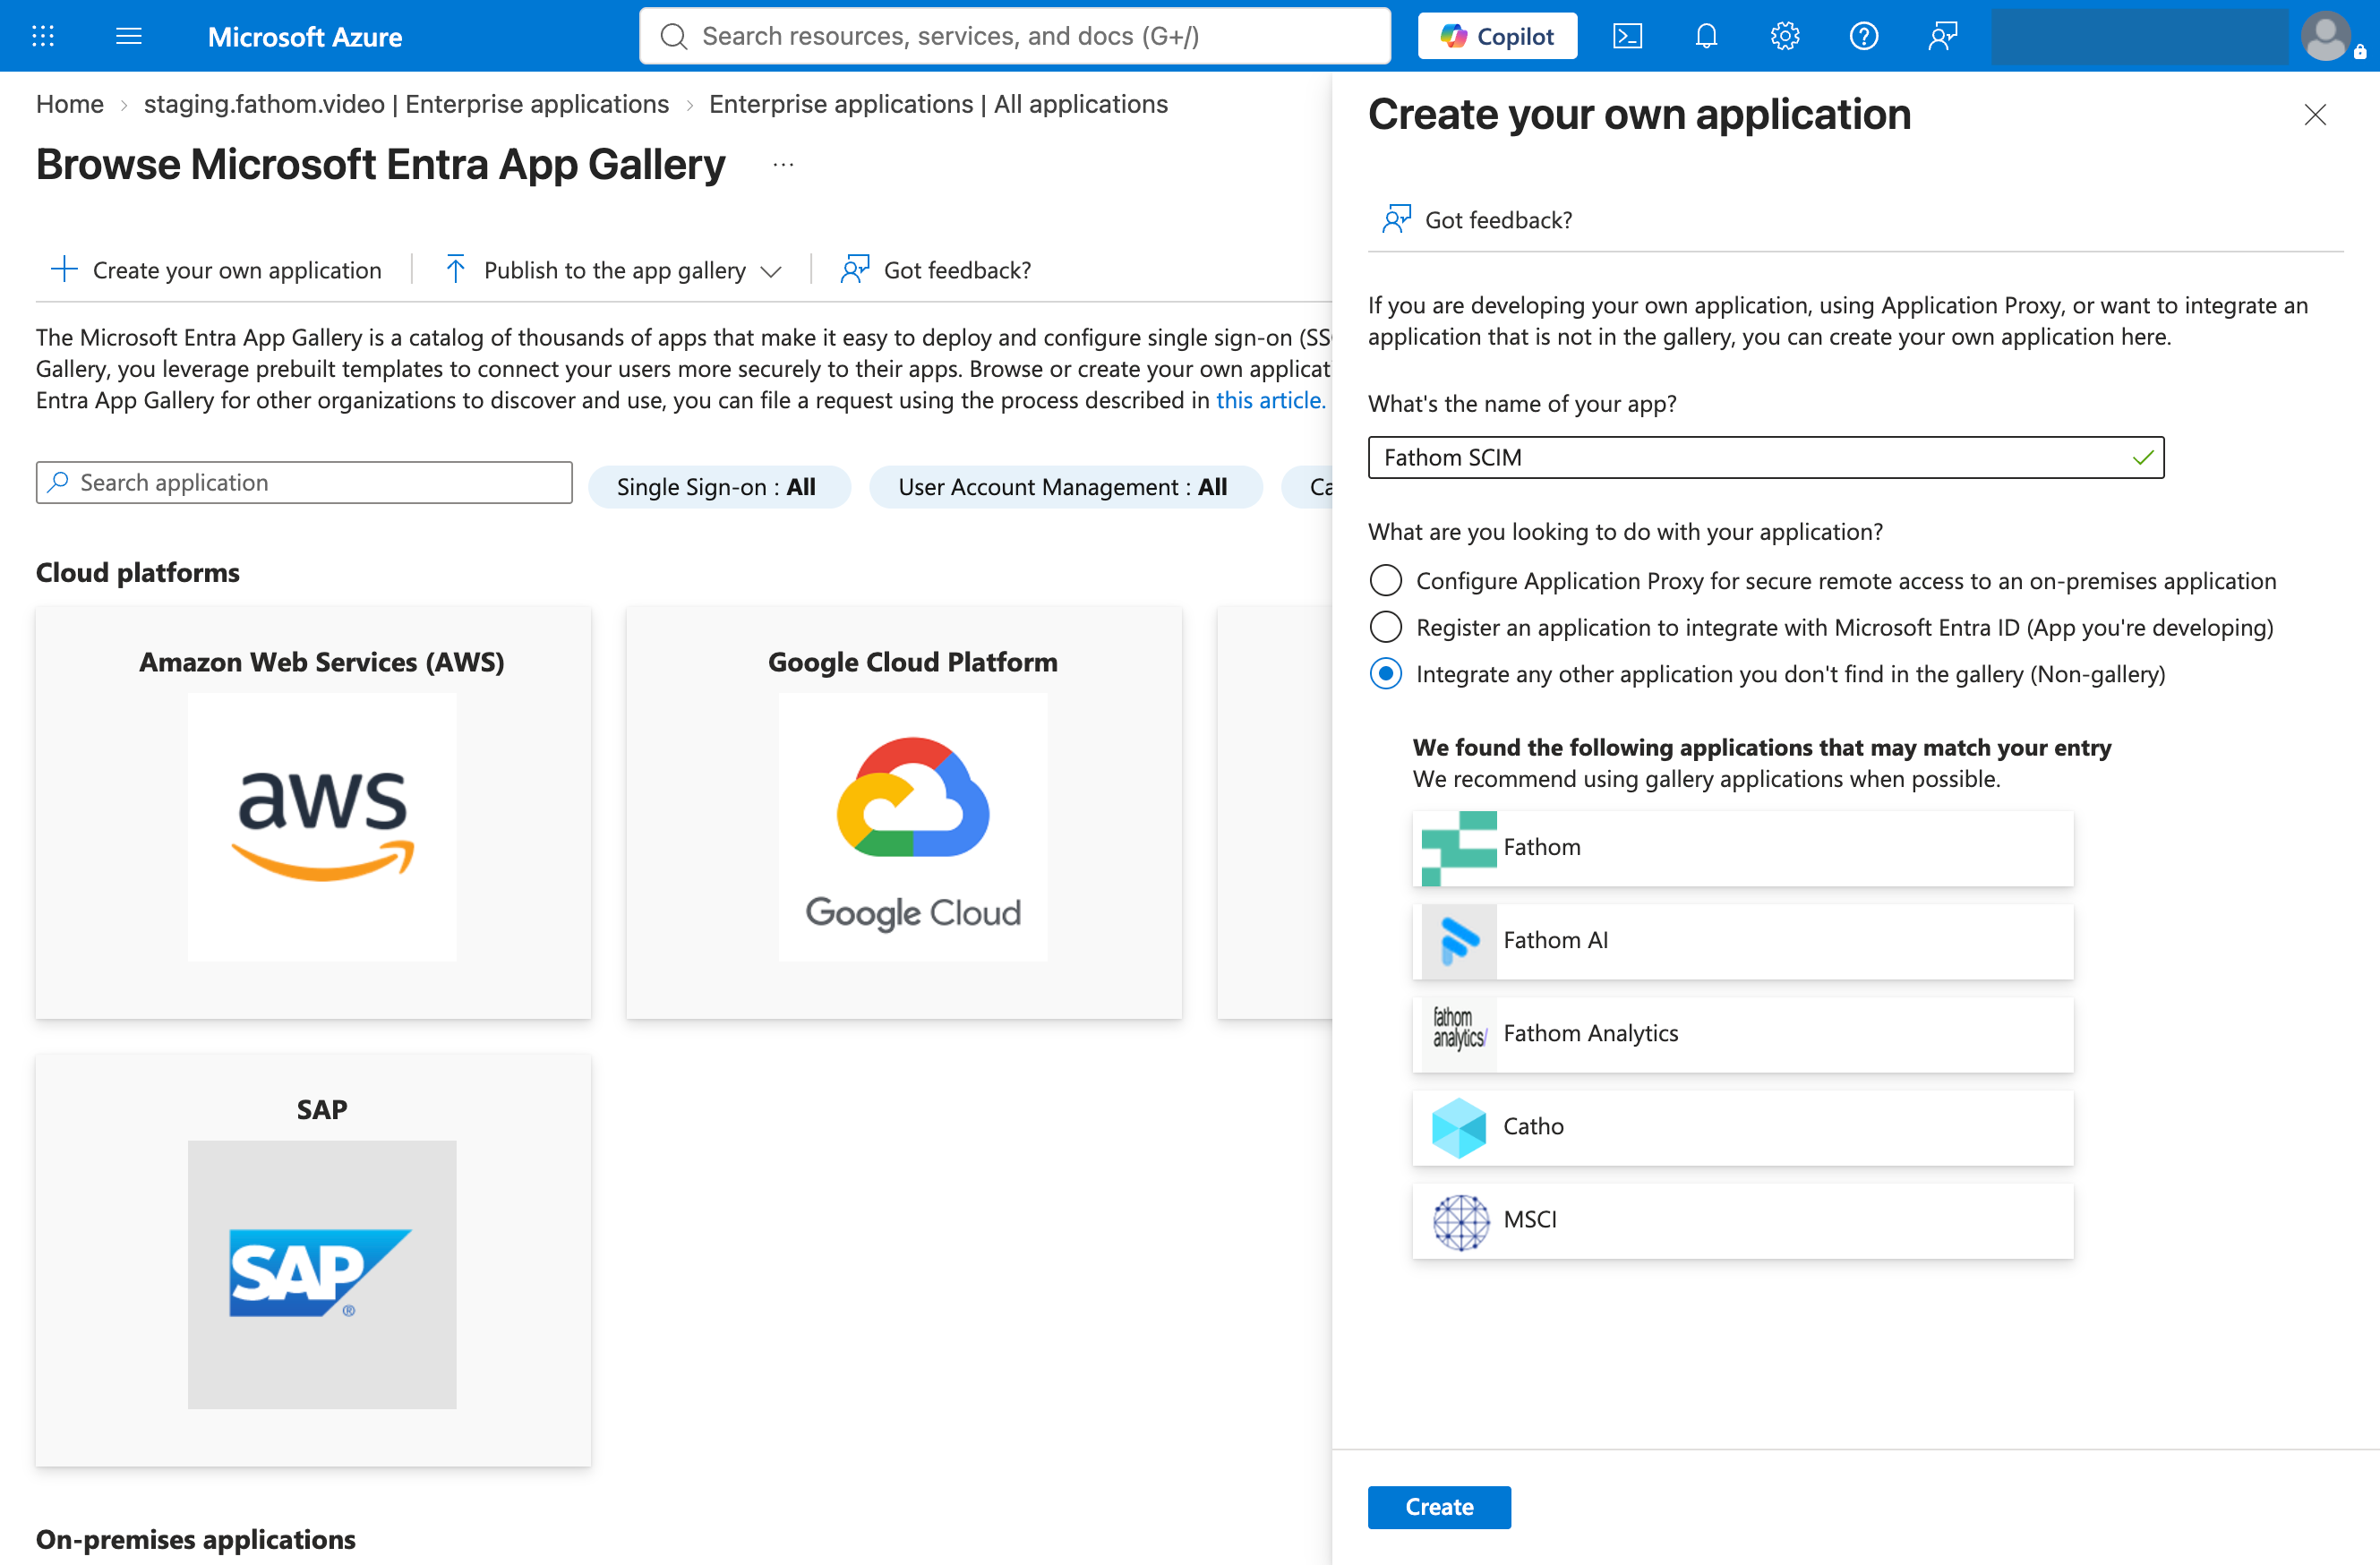
In the Microsoft Azure portal, go to Enterprise applications → All applications → New application.
Click + Create your own application.
Name the app.
Select Integrate any other application you don't find in the gallery (Non-gallery).
Click Create.
Do not select one of the suggested gallery apps (Fathom, Fathom AI, Fathom Analytics). Those are unrelated applications and will not provision to your Fathom organization.
Step 3: Connect Entra ID to Fathom
From your new application, go to Manage → Provisioning.
Click New configuration (or Connect your application on the Get started screen).
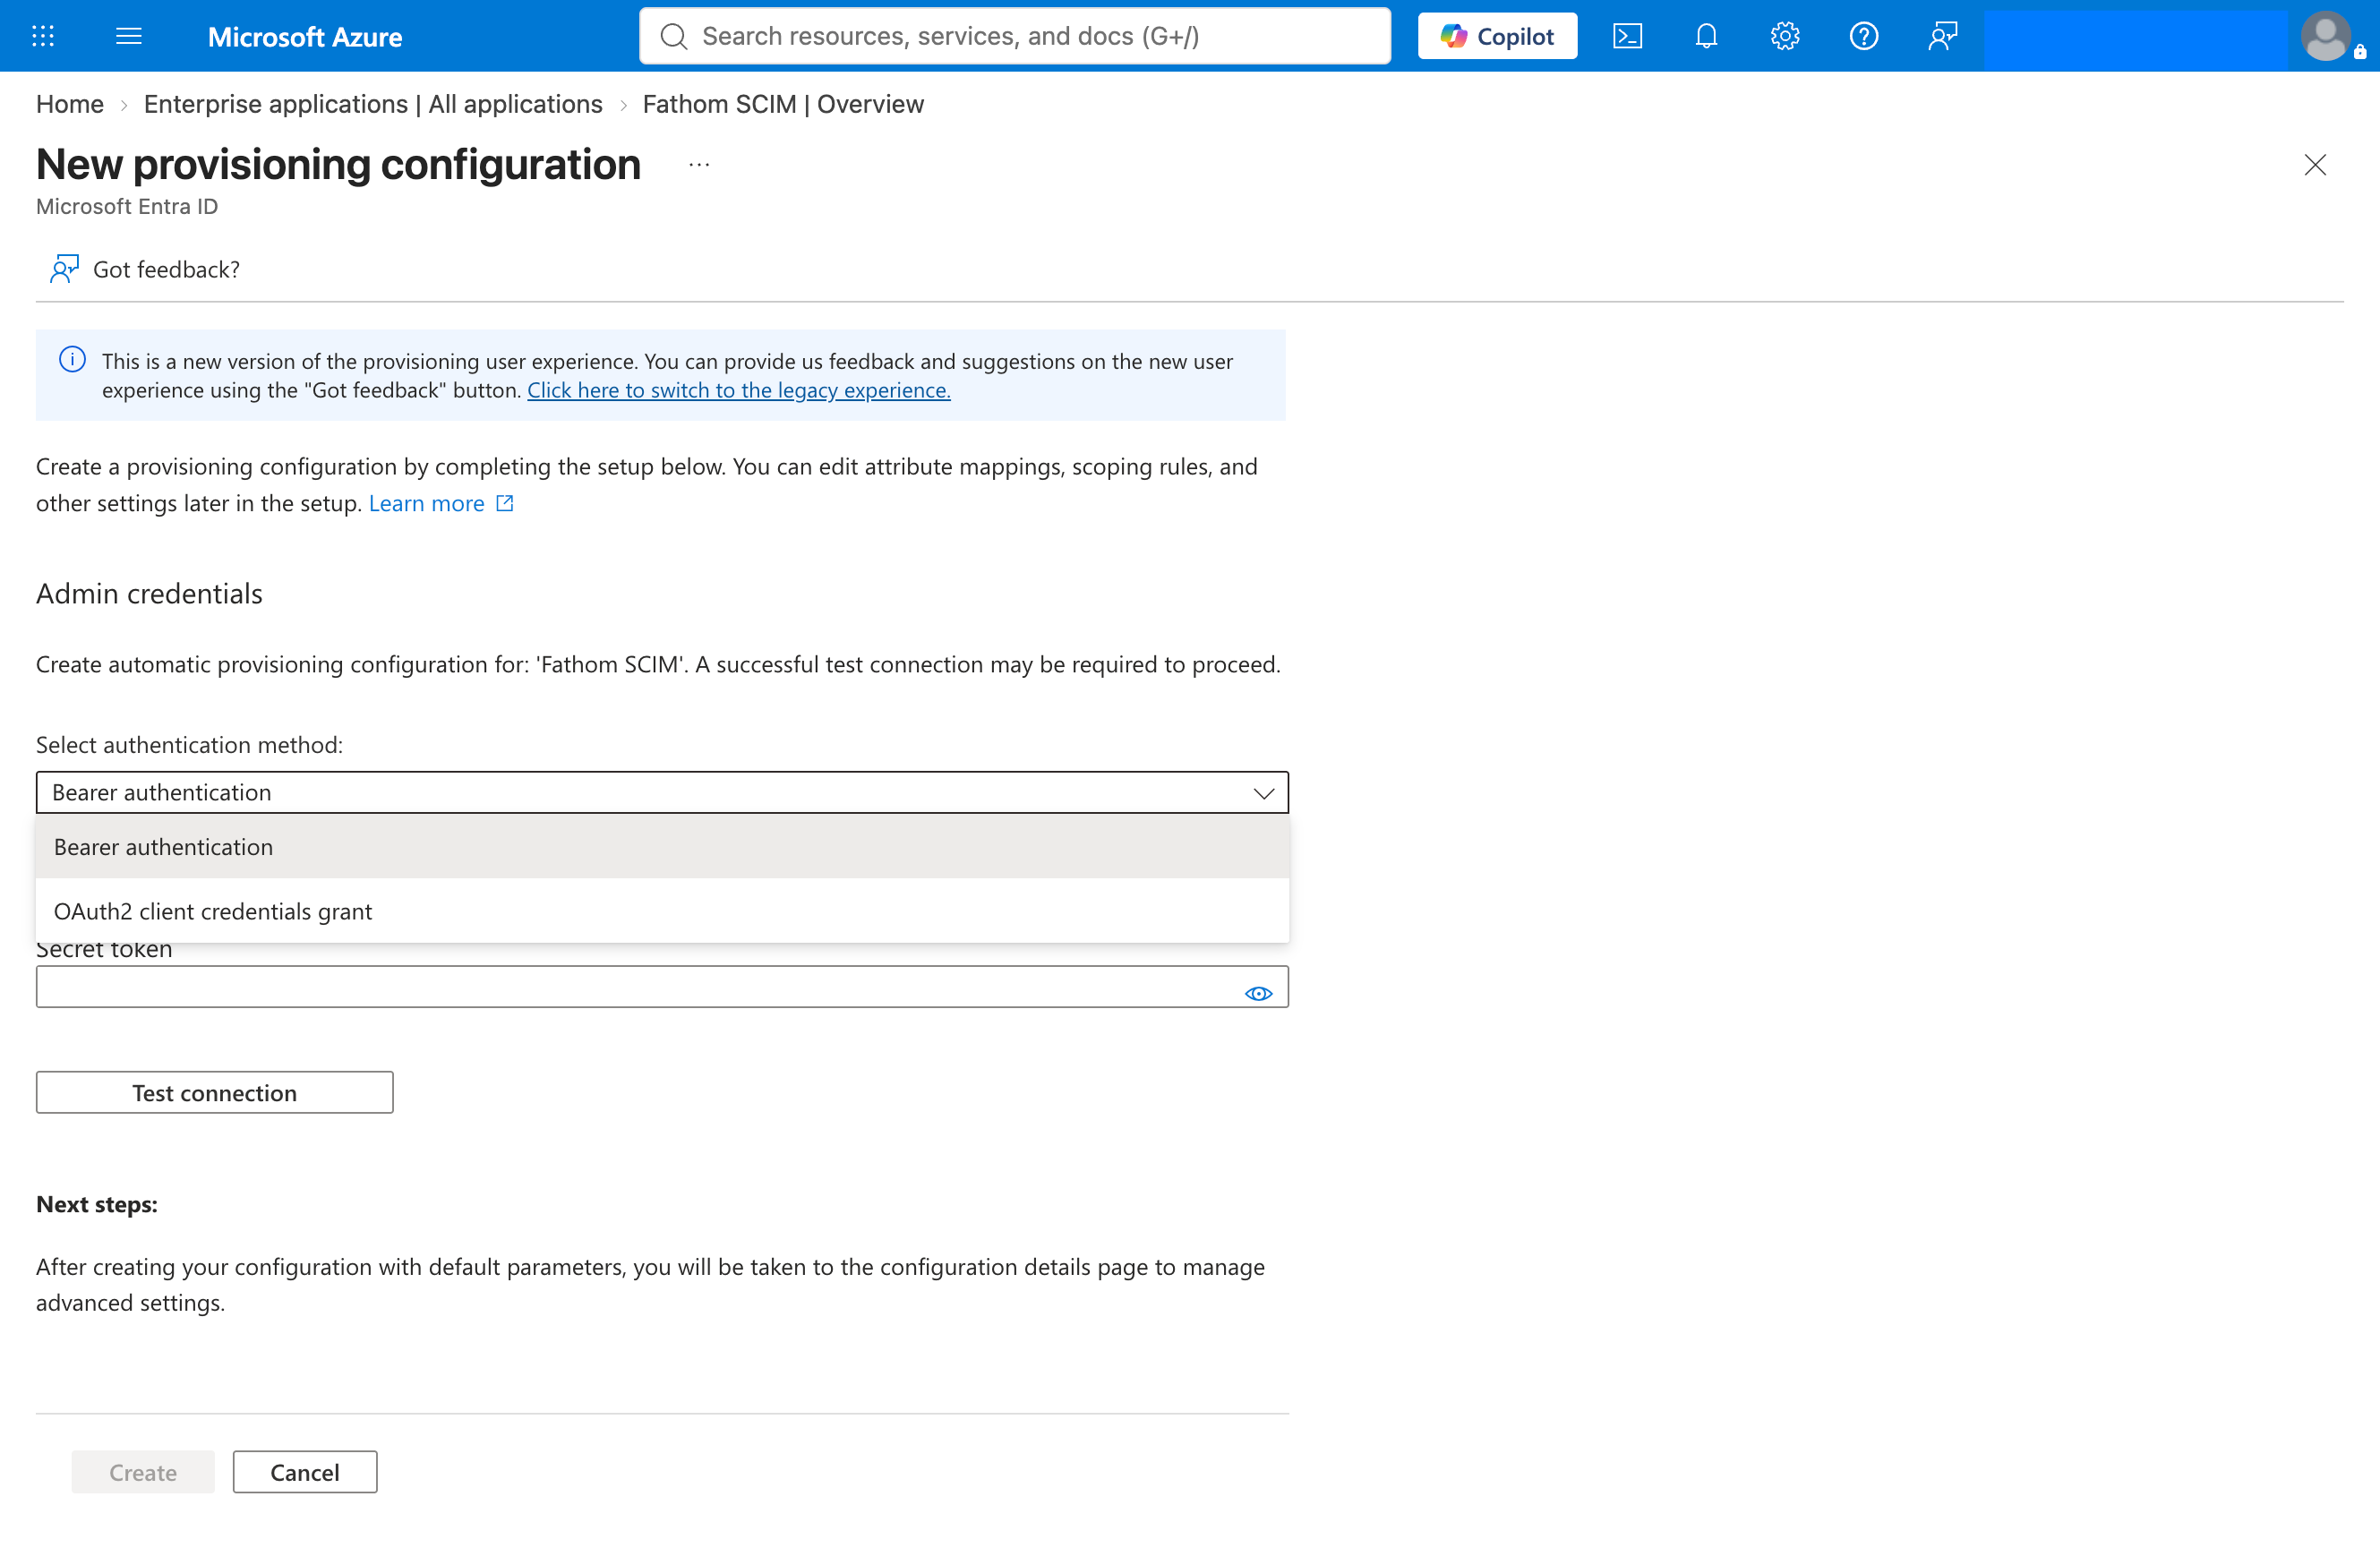
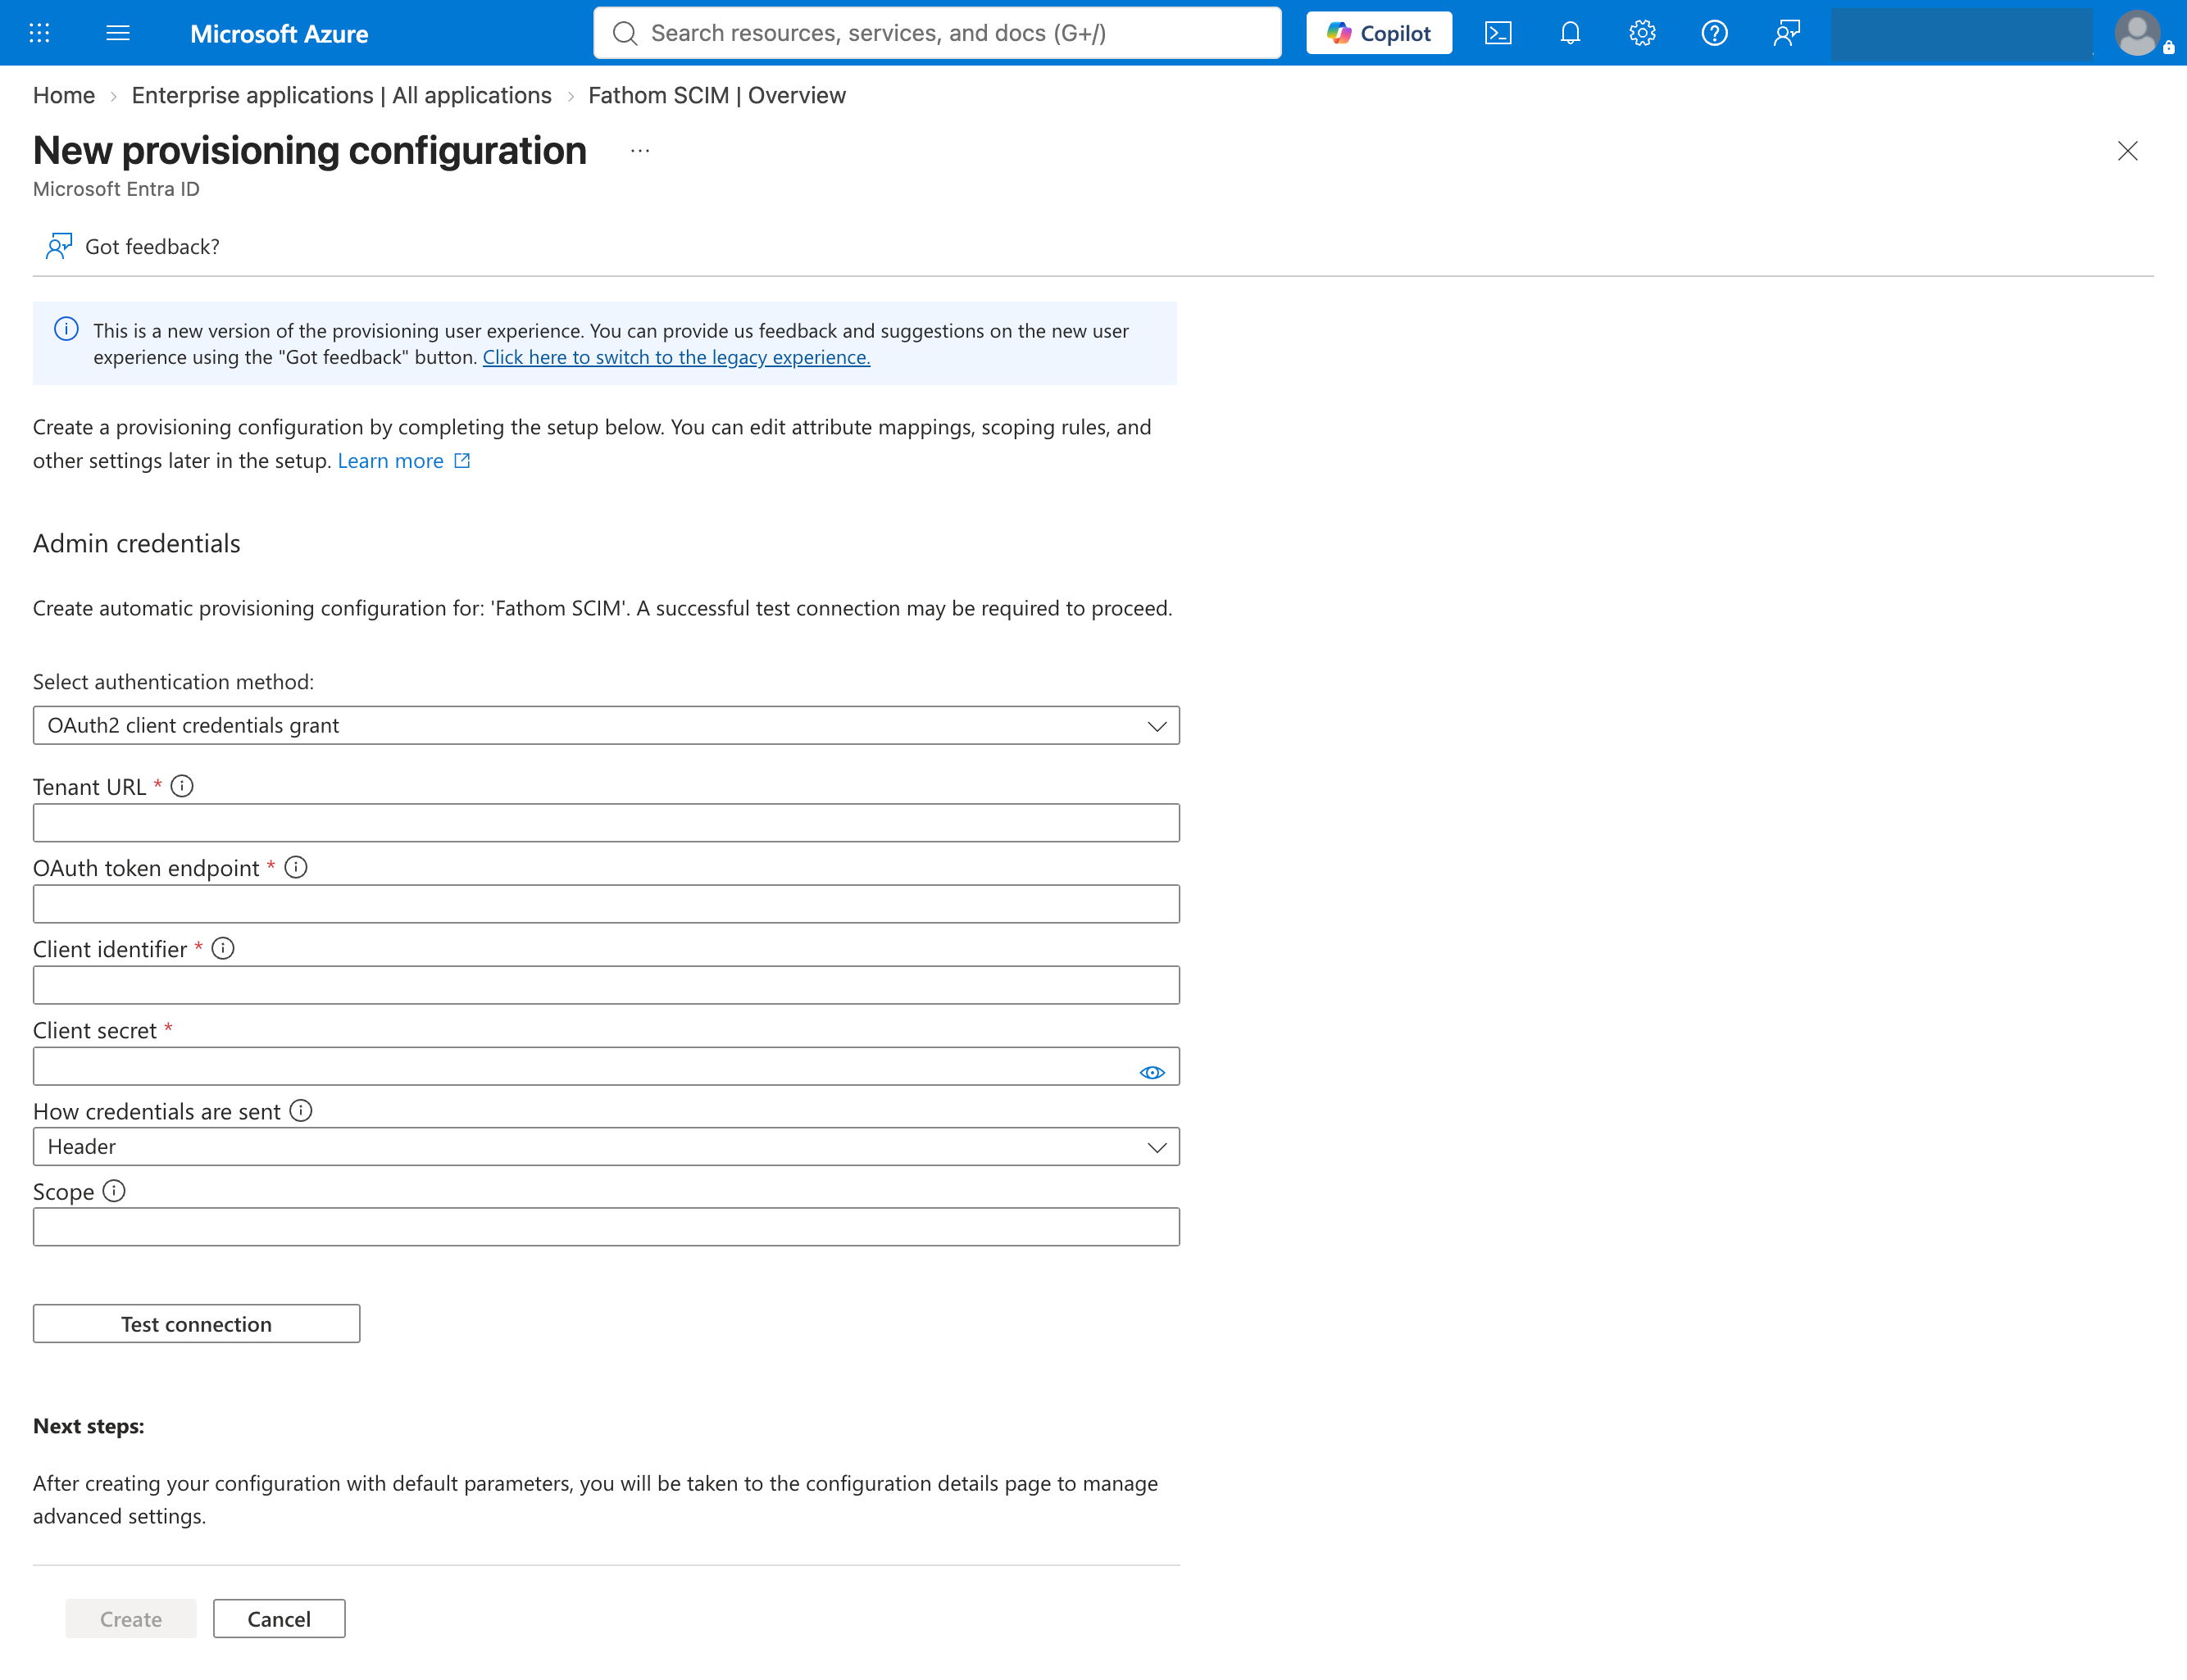
Under Select authentication method, change the dropdown from Bearer authentication to OAuth2 client credentials grant.
Fill in the fields using the values from your Fathom configuration page:
Tenant URL — from Fathom
OAuth token endpoint — from Fathom
Client identifier — from Fathom
Client secret — from Fathom
How credentials are sent — leave as Header
Scope — leave blank
Click Test connection and confirm it succeeds.
Click Create.
If the test connection fails, the most common causes are:
Bearer authentication is still selected instead of OAuth2 client credentials grant
The client secret was truncated or mistyped when pasted
The credentials were revoked in Fathom after you copied them
Step 4: Assign Users and Groups
Groups are the SCIM mechanism in Fathom: without one, users will not auto-join your organization. You can create multiple groups and map each to a different Fathom Team. Create those Teams in Fathom first if you have not already.
In your Entra application, go to Users and groups and assign the users and groups you want provisioned to Fathom.
Return to Provisioning and start provisioning.
Step 5: Link the Group to a Fathom Team
Once your group is assigned in Entra ID, link it to the corresponding Team in Fathom. This connection determines which Fathom Team newly provisioned users are added to.
Group names can take a few minutes to appear in Fathom after provisioning first runs. If the list is empty, wait a moment and refresh.
Step 6: Test with a Single User
Before rolling out broadly, provision one test user through your group and confirm they appear correctly in Fathom under the expected Team. You can check this under Team Settings → Users.
How User Status Syncs Between Entra ID and Fathom
Entra ID action | Fathom result |
|---|---|
User activated and added to an assigned group | User created/activated in Fathom, added to linked Team |
SCIM-provisioned user deactivated in Entra ID | User deactivated in Fathom |
User removed from an assigned group | User removed from the Fathom Team (does not deactivate the account) |
Removing from a group and deactivating are two distinct actions with different outcomes:
Removing someone from a group unlinks their Team membership in Fathom but leaves their account active — they can still log in, and their recordings remain intact.
Deactivating someone in Entra ID also deactivates their Fathom account — they can no longer log in, but this does not affect their Team membership or recordings in Fathom.
Choose the action that matches what you are trying to accomplish.
Enabling SCIM for an Org with Existing Fathom Users
When SCIM is connected, Fathom automatically runs a backfill to match existing Fathom accounts to their Entra ID identity, matched by email. This happens immediately — there is no preview step.
Before connecting SCIM: make sure existing users are already placed in the correct Entra ID group. If a user's group does not match their current Fathom Team, the backfill can unexpectedly change or remove their Team membership.
FAQs and Common Scenarios
"I don't see Microsoft Entra ID Provisioning in my Fathom settings" This feature is enabled by the Fathom team. Contact Support to have SSO and Entra ID provisioning turned on for your organization. You also need to be an admin on the Fathom account to see it.
"Test connection fails in Entra" Confirm you selected OAuth2 client credentials grant rather than Bearer authentication, that all four values were copied in full, and that the credentials have not been revoked in Fathom since you copied them.
Users aren't being provisioned to the correct Team Most commonly this is because the group is not assigned to the application correctly, or Update User Attributes is not enabled in your provisioning settings, which can prevent Team updates from syncing correctly.
I can't send invites in Fathom, they disappear With SCIM configured, all administration aspects of users are given to Entra ID, so you must add users to your Fathom Teams via Entra ID groups.
A user exists in multiple groups, but exists in only one Fathom Team Fathom supports one group mapping per user, based on the first mapping created. A single user cannot be mapped to multiple Teams.
"Users can log in to Fathom, but they aren't a member of my Team/Organization in Fathom" To be added to your Team, the user must be assigned to a group that is linked to a Fathom Team. Without that assignment, provisioning does not include them in your Team subscription.
How do I set up SCIM provisioning with Okta? Please see this article Setting Up SCIM Provisioning with Okta for more information.